Intro
pritunl is an “Enterprise Distributed OpenVPN and IPsec Server”. It’s a solution to allow you to VPN in to your network and to link multiple networks together.
All well and good, but what could you actually use it for?
My aim for this series of posts is to show you how I’m using pritunl to:
- VPN in to a “Transit VPC” in AWS
- Link that Transit VPC and a VPC in Google Cloud
- Use AWS services like RDS or S3 from Google Cloud - without going via the internet.
In the future, I’ll perhaps expand on pritunl, covering high availability setup, two factor authentication (2FA/MFA) and more practical aspects of running this in production.
For the first part I’ll focus on step 1 - setting up a transit VPC and connecting to it.
I’m going to use the GUI for both cloud services - just to mix it up a bit. I’m going to use the eu-west-1 region, but that’s pretty unimportant too. Just choose a region geographically close to you if you’re going to be using this for real.
If you are going to do this for real - you’ll probably want to actually read the documentation. There’s nothing particularly novel in this post, I’ve just taken the time to put everything on a single page for a simple use case.
I’m going to assume you understand the basics of launching servers in AWS or GCP. If you don’t, you’ll probably be able to follow along anyway.
Setup
AWS
VPC
First, let’s make a new VPC and call it transit. In this case I’m just going to use the AWS wizard and create a “VPC with a Single Public Subnet”. In production - you might want to have two public subnets so you can run pritunl instances in multiple Availability Zones.
I’ve gone for a 10.10.0.0/24 subnet, but there’s no real rhyme or reason here. You just need to be sure that this won’t collide with the IP space in any other network you’ll be connecting to.

pritunl EC2 server
Now, over to EC2, we’re going to create the first of two t2.micro instances. Go through each tab in the configuration page, there are a few things you’ll need to set:
- Network and Subnet to your new
transitVPC - Auto-Assign public IP to enable
- Under advanced details, add the following User data:
#!/bin/bash
sudo tee -a /etc/apt/sources.list.d/mongodb-org-3.4.list << EOF
deb http://repo.mongodb.org/apt/ubuntu xenial/mongodb-org/3.4 multiverse
EOF

sudo tee -a /etc/apt/sources.list.d/pritunl.list << EOF
deb http://repo.pritunl.com/stable/apt xenial main
EOF

sudo apt-key adv --keyserver hkp://keyserver.ubuntu.com --recv 0C49F3730359A14518585931BC711F9BA15703C6
sudo apt-key adv --keyserver hkp://keyserver.ubuntu.com --recv 7568D9BB55FF9E5287D586017AE645C0CF8E292A
sudo apt-get update
sudo apt-get --assume-yes install pritunl mongodb-org
sudo systemctl start pritunl mongod
sudo systemctl enable pritunl mongod
- Under Tag add a sensible name like
pritunl - Under Configure Security Group, create the following (HTTP optional, used for Let’s Encrypt only)
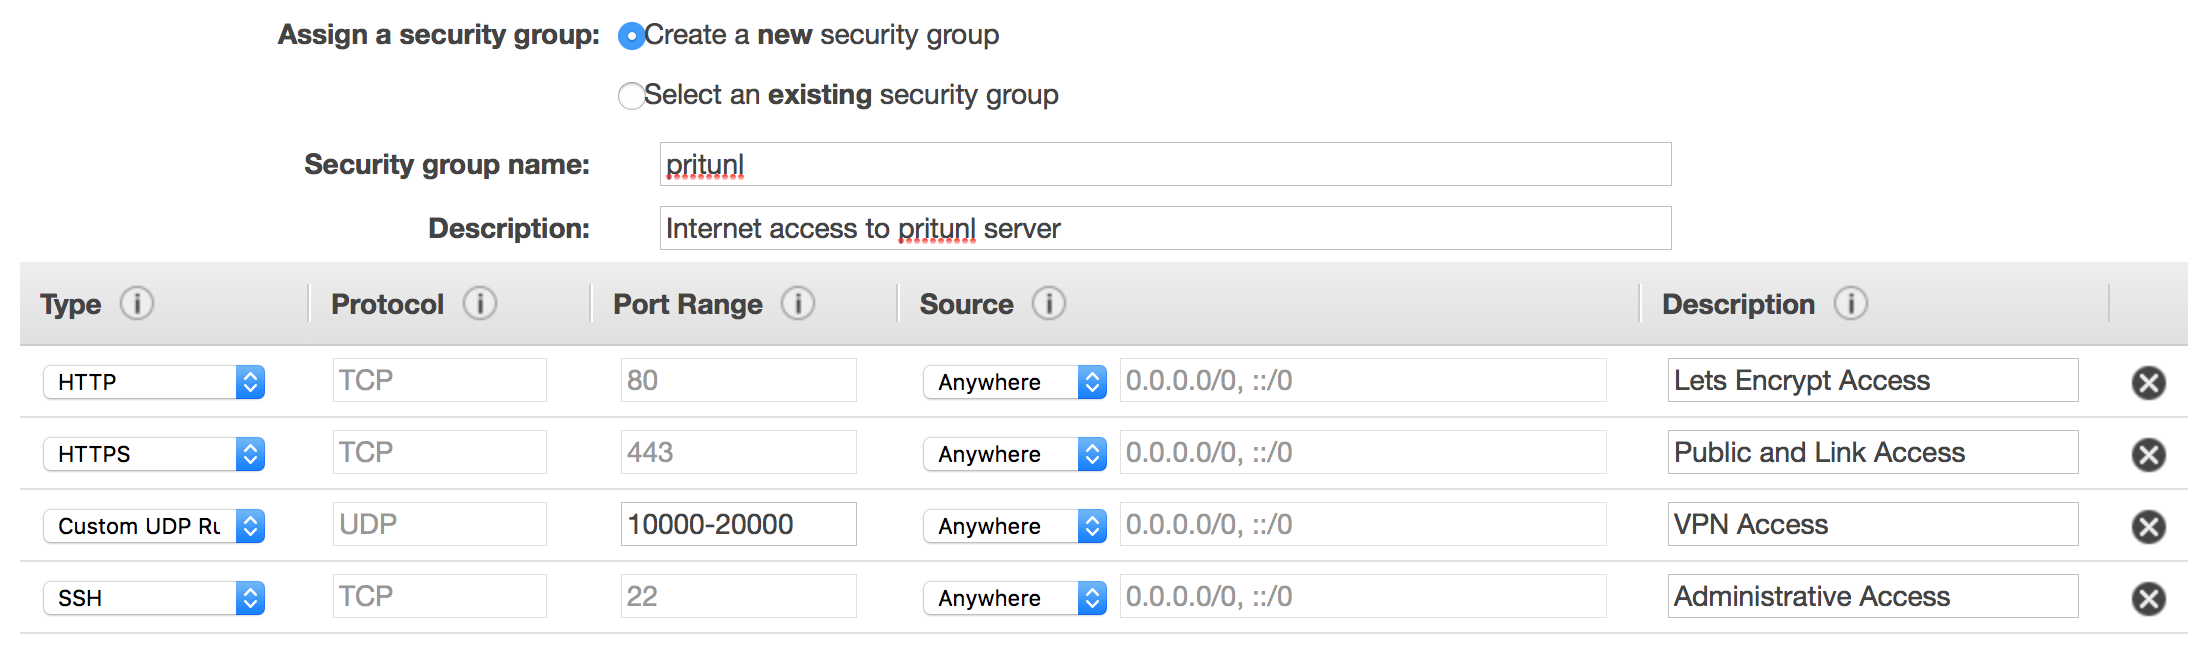
- You’re done - launch the server
After a few minutes, you should be able to SSH in to your server and connect via HTTPS at the public IP provided by AWS. At this point, you may decide to give the server a hostname. You could just assign an Elastic IP and a DNS record - I’ve gone with https://pritunl.martinlee.org for this demo.
Server Setup
The website will lead you through a setup wizard, about the only manual step to take is to SSH in to the server and run sudo pritunl setup-key
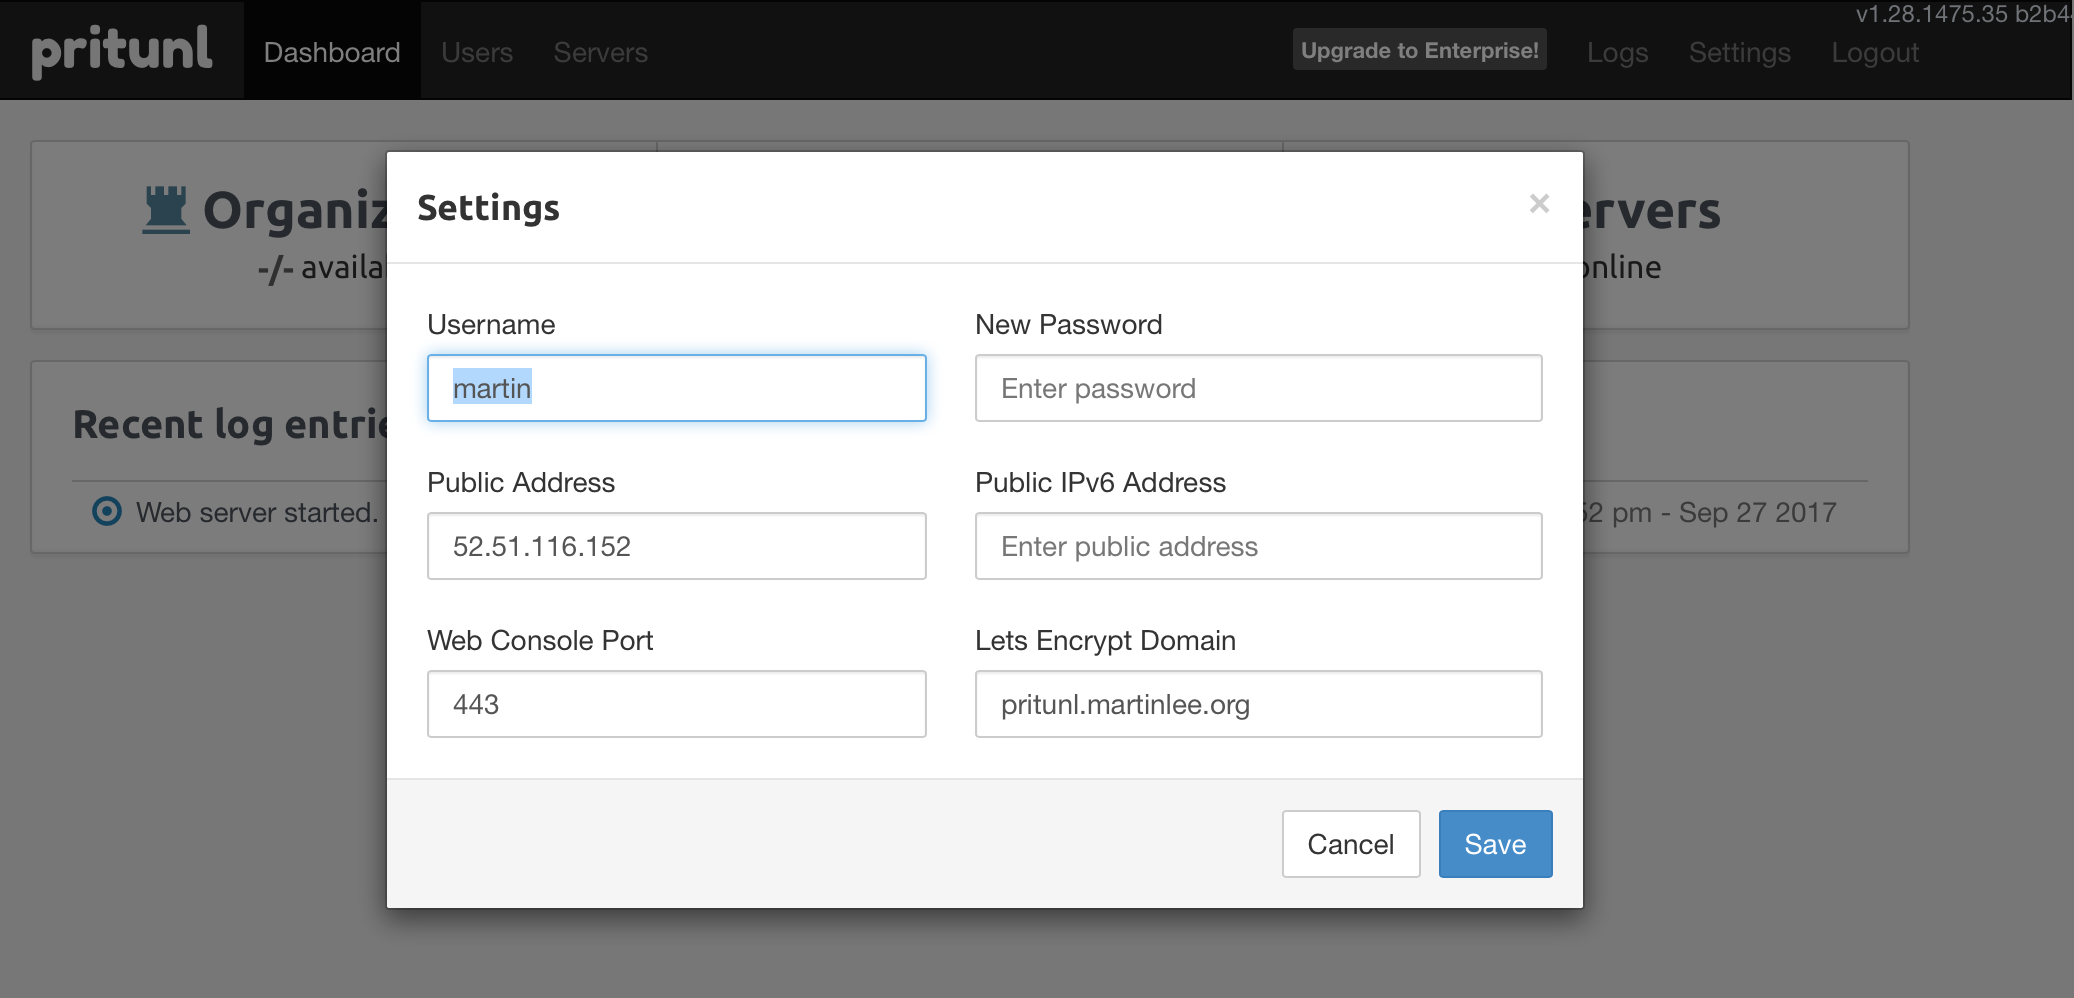
You’ll then need to configure the server by following the obvious prompts.
Next, go to Users and click Add Organization. This defines your Certificate Authority (CA) - you won’t be able to move users between organizations.
Add User next, set this user up however you want and assign them a pin.
Now head to Servers and click Add Server. All you need to set here is a name - you can leave everything else at its default. Feel free to click Advanced and have a poke around at the more complex options but don’t change anything just yet.
Click Attach Organization and choose the organization and server you just set up.
Now click Start Server to set it in motion.
Client Setup
You can use any OpenVPN client, but the pritunl one (Download) has a few advantages. It can be configured by just passing it a URL and it can keep its own configuration up to date by automatically getting the updates when you make changes on your server.
Obtain your client configuration by clicking the Get Temporary Profile Links icon on the Users page:
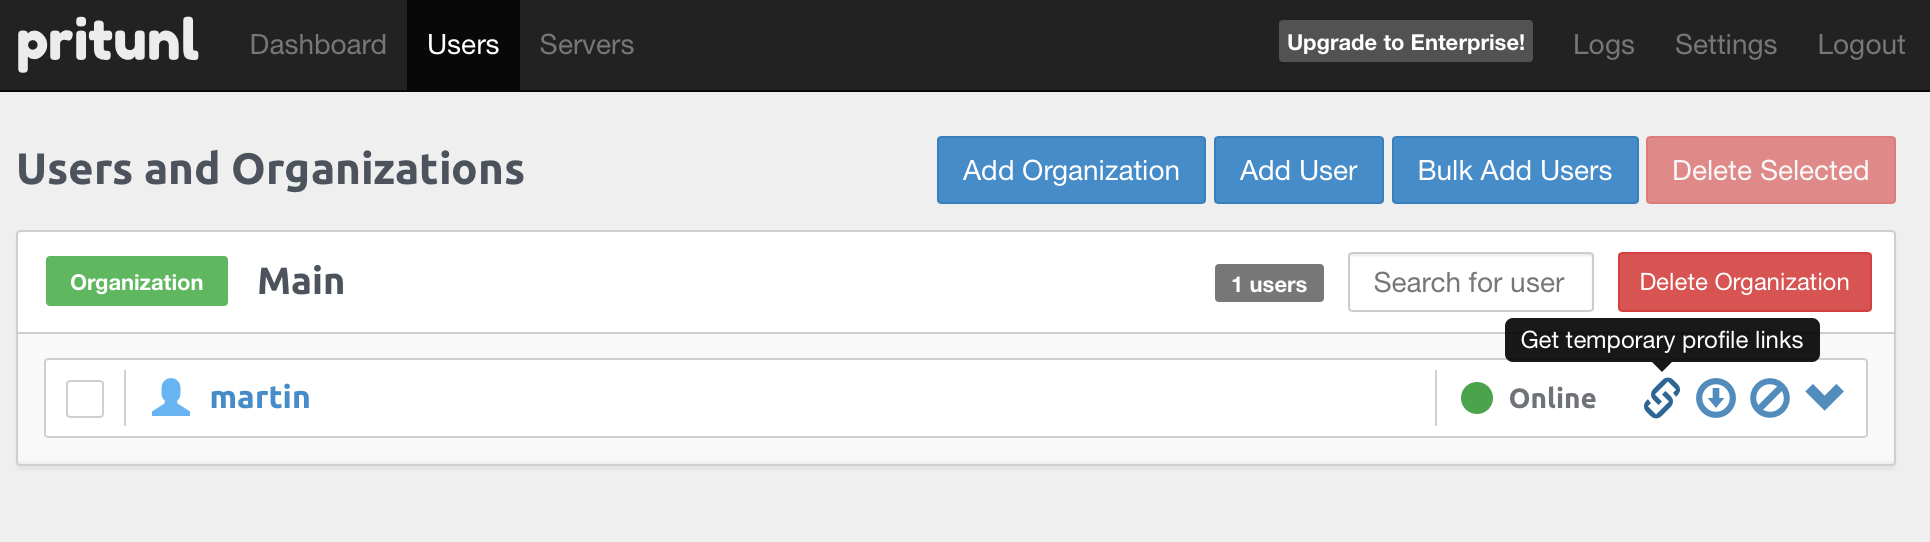
And import that into the Pritunl Client with the Import Profile URI option.
Now you can connect to your VPN! Click the Menu icon in the top right of the client and choose Connect.
Testing
First - let’s see what our IP appears to be:
$ dig +short myip.opendns.com @resolver1.opendns.com
52.51.116.152
Good start! That’s the IP address of the EC2 server I started earlier, so I’m definitely getting to the internet via it.
Now, let’s hit something inside our own VPC. AWS provides a couple of IP addresses by default we can test:
$ ping 10.10.0.1 -q -c 5
PING 10.10.0.1 (10.10.0.1): 56 data bytes

--- 10.10.0.1 ping statistics ---
5 packets transmitted, 5 packets received, 0.0% packet loss
round-trip min/avg/max/stddev = 15.327/15.949/17.184/0.675 ms
The first IP address in your subnet is your default gateway. I’m seeing 15ms ping times, which seems about right for me to get to a server in the eu-west-1 region.
$ dig @10.10.0.2 blog.martinlee.org +short
54.192.28.185
54.192.28.229
54.192.28.237
54.192.28.241
54.192.28.101
54.192.28.116
54.192.28.131
54.192.28.156
The second IP address in your subnet is a DNS server (assuming you have DNS enabled for your VPC - it is by default). Here we can see we can use our VPC name servers - this could come in handy in future.
Outro
That’s all for now! I’m drafting a few more posts with some more detailed use cases, but this absolutely gets you to the point where you could use a pritunl VPN to protect your internet access when on public wifi or put a VPN in a VPC where you have infrastructure that you’d like to manage privately.
Bear in mind this isn’t a VPN that gives you any measure of anonymity - your source IP is linked to you by your AWS account.